


Customer Service
 Technical support via E-Mail
System Requirements
OS: Windows 98 and above
CPU: 133 MHz
RAM: 128 MB
Video: VGA (800 x 600)
Microsoft Outlook 97-2010
* - please read detailed requirements specified for each product individually.
How to Convert XLS to Outlook
Microsoft Outlook is an absolutely wonderful piece of software. You can use it to send and receive emails with ease. However, one of the biggest gripes people have with the software is trying to locate a specific attachment. After all, we only have those little paper clips to give us an indication as to whether an attachment is there or not, but it doesn’t tell us what attachment is there until we open the email! There is a much better way though. Did you know that you can import any files into Outlook with the right software? These are known as ‘single attachments’ and serve a number of benefits. For the purposes of this article I want to discuss how to convert XLS to Outlook.
Firstly, lets take a little look as to why you would want to carry out an XLS to Outlook conversion. Firstly, it makes it easier to locate files that you are going to be sending out on a regular basis to clients. Remember, they will appear in the email as opposed to an attachment, and this helps maintain a rather professional approach. In addition to this, it also provides a good area to backup your important documents, after all, it is much easier to backup all of Outlook files than individual ones. Finally, you can use convert XLS to PST so that you can password protect your files, which ensures that nobody who isn’t meant to see them ends up seeing them! Whilst there are plenty of converters available, the one I want to discuss with you is an XLS to Outlook Converter known as Import Converter. In my opinion it is one of the better ones on the market and is incredibly simple to use.
Importing of Excel files to Outlook:
- Download conversion software and install it to your computer.
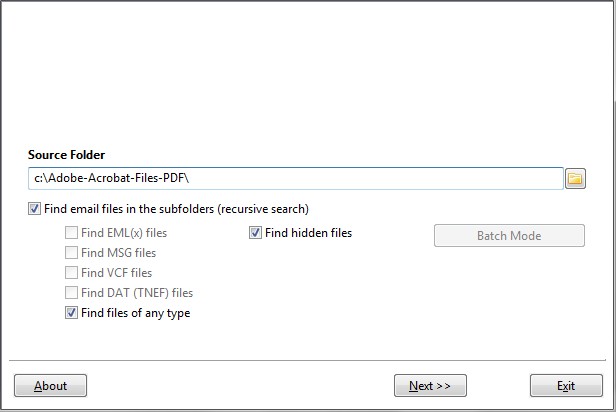
- Once you have the software installed, boot it up. There should be a shortcut on your desktop to make this much easier. Import Converter will then ask you to find the files that you are going to be using for your XLS to Outlook Conversion. This should be rather simple to do. Since you are only going to be converting XLS files, select the ‘Find Files of Type‘, this will then find the files for you. Click next.

- You do not need to change anything on this next page if you don’t wish to, although take a browse through the options here just to get a feel for using the software.
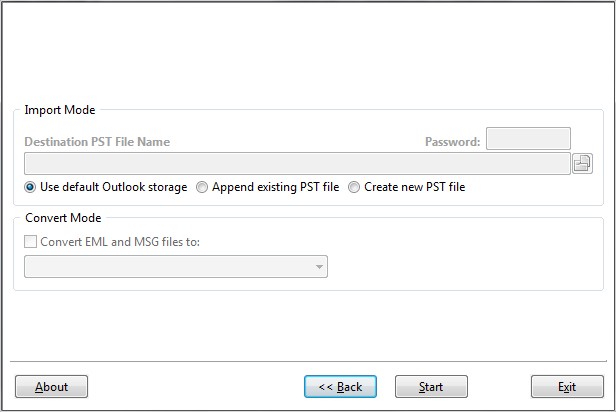
- The next screen is the most important. This is where you select where the files are going to go after the XLS to Outlook Conversion has been carried out. You basically have three options here. The first will be to add your converted files to a specific storage place within Outlook. The other two options are expressly for XLS to PST. You can either add your converted files to a new PST or add to one that you made earlier.
- Click next and the software will start to convert the data. It shouldn’t take too long. Make sure you follow the instructions through to the end and the XLS to Outlook Conversion has been completed.
As you can see, it really is easy to convert your XLS documents to Outlook today. All you need to do is grab a copy of Excel to Outlook Converter and you are ready to go.